Jupyter AI in Open OnDemand
Jupyter AI brings conversational AI capabilities directly into your JupyterLab environment. Use AI chat assistance, code generation, and natural language commands within your notebooks through ASU's Research Computing infrastructure.
Jupyter AI integrates large language models into JupyterLab, enabling you to:
- Get coding help and explanations through an interactive chat interface
- Use AI magic commands (
%%ai) directly in notebook cells - Generate, debug, and optimize code with AI assistance
- Ask questions about your data and analysis workflows
Getting Started With Jupyter AI
Before you begin, ensure you have:
- An active ASU Research Computing account
- Successfully connected to the Web Portal
- A valid Voyager API key (instructions below)
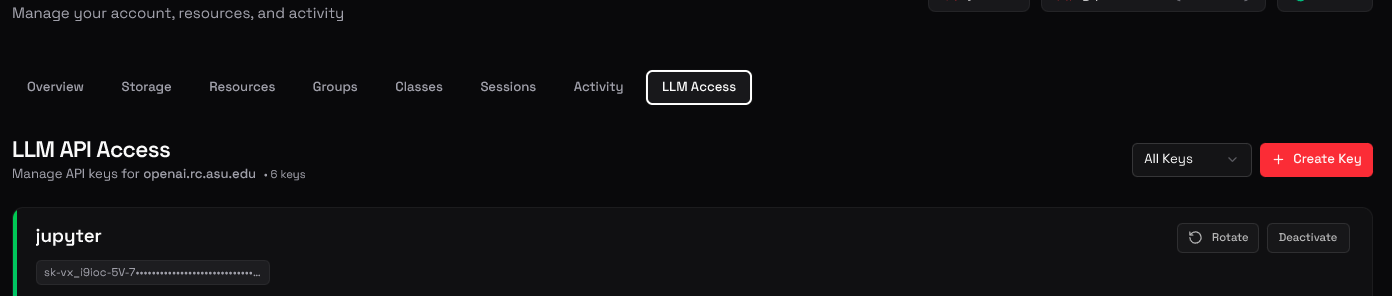
Step 1: Generate Your API Key
You'll need an API key from Voyager to authenticate with ASU's LLM services.
- Navigate to https://voyager.rc.asu.edu and log in
- Click on the LLM tab in the navigation menu
- Generate a new API key
- Copy and save your API key in a secure location
Your API key is sensitive information. Keep it secure and never share it with others or commit it to version control.
Step 2: Launch Jupyter AI Session
- Log in to the web portal
- Navigate to Interactive Apps → Jupyter
- In the session configuration:
- Select the Jupyter-AI version from the dropdown
- Configure your compute resources (cores, memory, time limit)
- Choose your partition/queue
- Click Launch to start your session
- Once ready, click Connect to Jupyter to open JupyterLab
Step 3: Configure Jupyter AI
Now you'll connect Jupyter AI to ASU's LLM service using your API key.
-
In JupyterLab, open the Chat panel (look for the chat icon in the left sidebar)
-
Click the gear/settings icon in the chat panel

-
Configure the following settings:
API Endpoint URL:
https://openai.rc.asu.edu/v1API Key:
Paste the API key you generated in Step 1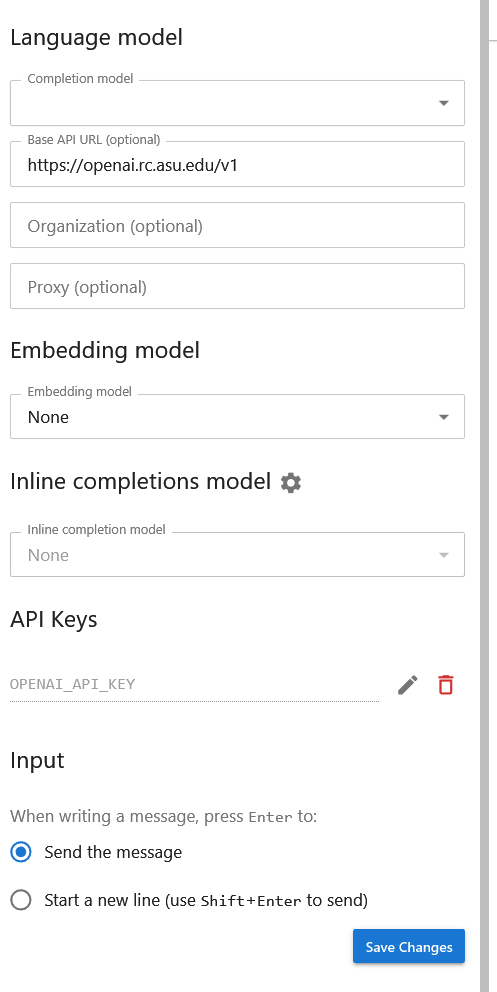
-
Click Save to apply the configuration
Using Jupyter AI
Chat Interface
Use the chat panel to:
- Ask questions about Python, data science, or your code
- Request code examples and explanations
- Get debugging help
- Discuss analysis approaches
Simply type your question in the chat and receive AI-generated responses.
Magic Commands in Notebooks
Jupyter AI provides magic commands for in-cell AI assistance:
%%ai
Explain how to load a CSV file with pandas and show the first 5 rows
The AI will generate code directly in your notebook cell.
Troubleshooting
Authentication Errors
If you receive authentication errors:
- Verify your API key is correct and hasn't expired
- Check that the API endpoint URL is exactly:
https://openai.rc.asu.edu/v1 - Try regenerating your API key in Voyager and updating the configuration
Chat Not Responding
- Ensure you've saved the configuration after entering your API key
- Restart the JupyterLab kernel (Kernel → Restart Kernel)
- Check that you selected the Jupyter AI version when launching the session
Need to Update Your Key
If your API key expires or needs rotation:
- Generate a new key in Voyager
- Open the chat settings (gear icon)
- Replace the old key with your new one
- Save the configuration
Additional Resources
Your API key is stored only in your JupyterLab user configuration and is not shared with other users or sessions.